Table of Contents
ToggleLiving off-grid in a tiny house means independence, but it also means taking control of one essential resource: water. An off-grid water system isn’t just a luxury upgrade: it’s the backbone of self-sufficient living in compact spaces. Whether you’re downsizing, moving to remote land, or simply want to reduce your environmental footprint, understanding how to design and maintain a reliable water system will save you thousands in utility bills and countless headaches down the road. This guide walks through the core components: rainwater collection, filtration, plumbing layout, and seasonal upkeep. No fluff, just the practical knowledge you need to build a system that works in a tiny house.
Key Takeaways
- A tiny house off-grid water system combines rainwater harvesting, proper tank sizing, and multi-stage filtration to eliminate reliance on municipal water and reduce utility costs.
- Size your water storage tanks to bridge your region’s longest dry season by calculating daily household needs (60–80 gallons for a two-person tiny home) and local rainfall patterns, with a 20% buffer for emergencies.
- Implement a three-stage filtration system using mechanical sediment filters, activated carbon, and UV light or polishing filters to ensure rainwater is safe for drinking and household use.
- Bury exterior water lines below your region’s frost depth and insulate exposed pipes to prevent winter freezing, which is the most common cause of off-grid system failures.
- Establish a seasonal maintenance routine that includes monitoring tank levels, replacing filter cartridges, checking water clarity, and maintaining emergency backup water supplies for year-round reliability.
Why Off-Grid Water Systems Matter for Tiny Homes
Tiny homes operate on constraints: limited floor space, smaller utility budgets, and often remote locations without municipal water lines. An off-grid water system transforms these limitations into advantages. You’re not just saving on utility bills: you’re gaining freedom from aging municipal infrastructure and price hikes. For homeowners on rural land or in seasonal communities, a well-designed water system means you can live comfortably year-round without relying on aging wells or spotty municipal service.
Off-grid systems also align with the tiny house philosophy: intentional living and minimal waste. Rainwater harvesting and smart storage teach you to value every gallon. Unlike a conventional home connected to municipal supplies, you’ll know exactly where your water comes from and where it goes. This awareness often leads to lower consumption and better conservation habits.
The trade-off? You’ll invest time upfront in design and installation, and you’ll need to maintain the system seasonally. But that maintenance is straightforward, mostly monitoring, filtering, and winterization, not expensive plumbing repairs. For off-grid tiny house dwellers, a properly engineered water system is as essential as a solid foundation.
Rainwater Collection and Storage Basics
Rainwater harvesting is the simplest and most cost-effective way to supply an off-grid tiny home. The concept is straightforward: capture roof runoff, store it in tanks, and draw from that reservoir throughout the year. The key is sizing your collection and storage correctly so you don’t run short during dry months.
Your collection surface is typically your roof. A 400-square-foot roof in a region that receives 40 inches of annual rainfall can collect roughly 10,000 gallons per year (accounting for losses to evaporation and spillover). Metal or asphalt roofing works best: avoid tar or cedar shingles if you plan to drink the water, as they can impart unwanted taste and chemicals.
Instead of directing roof runoff into gutters that feed traditional downspouts, install a gutter system with a diverter valve. This diverts the first flush of water (which carries debris, bird droppings, and dust) away from storage tanks. After 5 to 10 minutes of flow, the diverter switches, sending clean water into your tank system.
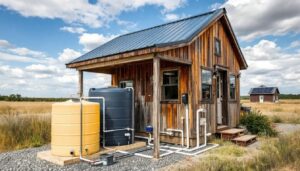
Tank selection depends on your space and climate. A tiny house might use two to four 1,000-gallon tanks (or one larger 2,500-gallon tank if you have room), typically made of food-grade polyethylene or steel with a sealed lid. Position tanks on or near the foundation for structural support: avoid direct sunlight to prevent algae growth. Cover vents with fine mesh screens to exclude insects and debris.
Calculating Collection Capacity and Tank Sizing
Determine your daily water needs first. A household of two typically uses 80 to 100 gallons per day (including showers, laundry, cooking, and toilet flushing). For a tiny home with conscious consumption habits, assume 60 to 80 gallons daily.
Next, find your region’s average annual rainfall (available from the National Weather Service or local extension offices) and calculate monthly rainfall variation. You’ll likely face a dry season when rainfall drops. Size your tank to bridge the longest dry period without running out.
Example calculation: If you need 70 gallons per day and face a 4-month dry season (120 days), you’d need roughly 8,400 gallons in storage. Two or three 2,500-gallon tanks would work: they can be connected in series or parallel depending on your plumbing layout. Always add 20 percent buffer for unexpected droughts or system inefficiencies.
When choosing tank quantity and size, consider your roof area and gutter capacity too. A steep-pitch metal roof sheds water quickly: a low-pitch roof sheds slowly. Poor gutter design causes overflow: oversized gutters waste potential collection during light rain. Plan for both the largest storm event your region typically sees and the gradual accumulation during steady rainfall. Communities building off-grid systems often consult off-grid plumbing solutions in forums to compare tank layouts and gutter designs proven in similar climates.
Filtration and Purification Methods for Safe Drinking Water
Rainwater is relatively clean if collected properly, but it’s not potable out of the tank. Sediment, bacteria, protozoa, and chemicals can all end up in stored water. A three-stage filtration system is standard for tiny house off-grid setups and removes most contaminants without breaking the budget.
Stage 1: Mechanical filtration removes particles. As water leaves the tank, it passes through a sediment filter, typically a 20-micron cartridge in a filter housing. This catches dust, pollen, and debris. Replace these cartridges every 6 to 12 months depending on rainfall and storage tank cleanliness.
Stage 2: Activated carbon filtration improves taste and odor while removing some chemicals and chlorine residue (if present). A 5-micron activated carbon cartridge is common. Some systems use a dual-cartridge setup for better flow rate.
Stage 3: Polishing and pathogen removal is the final step. Here, you have options: a final 1-micron sediment filter, ultraviolet (UV) light, or reverse osmosis (RO). UV systems kill bacteria and viruses using light, but don’t remove dissolved solids. RO removes nearly everything, producing very pure water, but it also wastes about 3 gallons of water for every 1 gallon produced, so it’s less ideal for off-grid homes where every drop counts.
For drinking water safety, many tiny house owners use UV treatment plus a final polishing filter. For non-potable uses (toilets, outdoor showers, gardening), tank water bypasses the full filter chain and draws from a separate outlet. This conserves filter life for where it matters most.
If your local building codes require certified drinking water or if you’re unsure of your water quality, have a sample tested by a local health department or lab. Testing costs $100 to $300 but reveals exactly what contaminants you’re dealing with, allowing you to size your filtration system accordingly. Many homeowners building tiny houses find detailed guidance on DIY filtration at Family Handyman, which covers both municipal and off-grid water solutions.
Installing a Functional Plumbing System in Limited Space
In a tiny house, every inch counts. Plumbing must be efficient, accessible, and code-compliant. The system typically runs from the storage tank (or an intermediate pressure tank) through a pump, filtration, and into the house via a single main line, then splits to serve fixtures.
Pressure tank selection: A 2- to 5-gallon diaphragm or bladder tank maintains water pressure between pump cycles, reducing strain on the pump motor and creating steady flow at fixtures. Without a pressure tank, your pump runs constantly, shortening its lifespan and wasting energy.
Pump choice: A 12V or 24V DC submersible pump powered by solar panels or a small generator is common for off-grid setups. Alternatively, an AC pump on a dedicated circuit (tied to a small solar-plus-battery system or backup generator) works well. Flow rate matters: aim for 3 to 5 gallons per minute for typical household use. An undersized pump frustrates users: an oversized pump wastes energy.
Routing the main line: In a tiny house, your main water line often runs along the interior wall or within the rim joist to reach all fixtures with minimal runs. Use ½-inch PEX tubing (cross-linked polyethylene) for in-house lines: it’s flexible, doesn’t require solder, and handles freeze-thaw cycles better than copper. Exterior supply lines from tank to house should be buried below frost depth (typically 3 to 4 feet, but check your local code) or insulated heavily to prevent freezing.
Connect the pressure tank, pump, and filter housing in a logical sequence: tank → pump → pressure tank → filtration → distribution. Use stainless steel fittings wherever possible to avoid corrosion. Install isolation valves at key points so you can service components without draining the entire system.
Drainage and greywater: For a tiny house, a septic tank and leach field handle wastewater. Size the septic system based on occupancy (typically 1,000 to 2,000 gallons daily capacity for a two-person household). Alternatively, a constructed wetland or sand filter system works for remote properties where traditional septic isn’t feasible. Always consult local health departments about wastewater requirements: regulations vary by county.
Some progressive tiny house builds incorporate greywater systems that recycle water from showers and sinks for toilet flushing or irrigation. This doubles your effective water supply and reduces load on the septic system. Greywater plumbing must be completely separate from potable lines to prevent cross-contamination. Codes around greywater reuse vary widely, so verify local requirements before designing your system. Resources like Country Living feature case studies of off-grid homes with integrated water management, offering real-world inspiration and practical details.
Winterization and Maintenance for Year-Round Use
Winter is where many off-grid water systems fail. Frozen pipes and tanks can crack, shutting down your water supply for days or weeks. Winterization prevents costly damage and ensures year-round reliability.
Insulation is your first line of defense. Exterior supply lines from tank to house must be buried at or below the local frost line, typically 3 to 4 feet deep for most US climates, deeper in northern regions. If burying isn’t feasible, wrap exposed pipes with ½-inch closed-cell foam insulation and encase it in rigid foam or PVC conduit. Heat tape (self-regulating electric ribbon) wrapped around exposed pipes adds backup protection, but it’s energy-intensive and should be reserved for critical sections.
Tank insulation matters too. Bury above-ground tanks in an insulated box, or build an insulated shed around them. Leave room for access and maintenance. A buried poly tank (most common for tiny houses) stays near ground temperature year-round, typically warmer than air temperature, which prevents freezing in most climates. In extreme cold regions (below –20°F regularly), consider a heated wrap or keep tanks indoors if space allows.
Pressure and relief valves should have frost-free drain outlets directed to daylight or a drain field, not back into the tank. Standard drain valves can freeze: specify frost-proof yard hydrants or heated drain boxes if you’re in a cold climate.
Filtration system maintenance: Replace sediment and carbon cartridges before winter to prevent clogging from sediment that settles in stored water over time. UV bulbs lose efficacy: replace annually or every 2,000 operating hours. After a heavy storm, visually inspect tank water clarity: if it’s cloudy, flush sediment from tank bottoms using a drain outlet valve at the lowest point.
Seasonal monitoring: Every 3 to 4 months, check tank levels (noting rainfall patterns), inspect filter cartridges for damage, and test water quality if you’re on year-round residency. Keep a simple log: rainfall, tank levels, filter change dates, and any issues. This log becomes invaluable if problems develop.
Emergency preparedness: Even the most robust system can fail. Keep 50 to 100 gallons of stored drinking water in food-grade containers as backup (rotate it every 6 months). This covers a 1 to 2-person household for several days if your primary system is down for repairs. A basic boiling setup or portable water filter can also supplement potable supplies during extended outages.
Conclusion
Building an off-grid water system for a tiny house is manageable, cost-effective, and deeply rewarding. The combination of rainwater harvesting, proper tank sizing, multi-stage filtration, efficient plumbing, and diligent maintenance creates a reliable supply that frees you from municipal dependence. Start by calculating your household needs and local rainfall patterns, invest in quality tanks and filtration, and don’t skip winterization. The upfront effort pays dividends in independence, lower utility costs, and the confidence that your water supply is truly under your control.